Import csv file in MySQL using PHP with example (PHP का उपयोग करके MySQL में csv फ़ाइल आयात करें):
Let us tell you how to Import csv file in MySQL using PHP script with example by steps (आइए हम आपको बताते हैं कि PHP स्क्रिप्ट का उपयोग करके MySQL में csv फ़ाइल को कैसे आयात किया जाए, उदाहरण के साथ चरण दर चरण)-
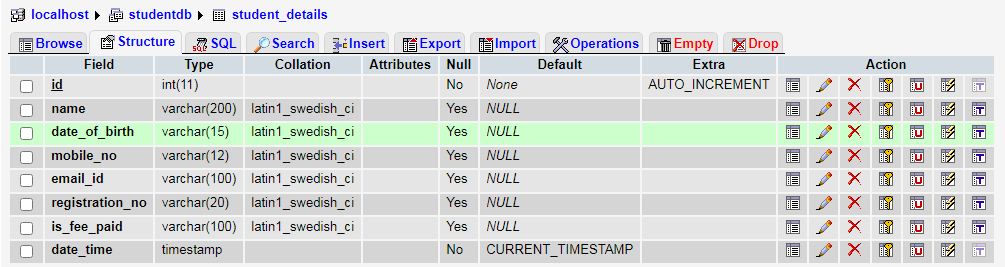
Step : 1– First create Database named “studentdb” & table named “student_details“.
Step : 2- Create dbconnection.php file add bellow codes for database connection (dbconnection.php फ़ाइल बनाएँ और डेटाबेस कनेक्शन के लिए नीचे दिए गए कोड जोड़ें)-
<?php
	// crete database connection
	$hostname = 'localhost';
	$dbUsername = 'root';
	$dbPassword = '';
	$dbName = 'studentdb'; // Database name

	// select database
	$con = new mysqli($hostname, $dbUsername, $dbPassword, $dbName);

	if ($con->connect_error) {
		die("Unable to connect database: " . $con->connect_error);
	}
?>
Step : 3- Create importForm.php file and add bellow codes (importForm.php फ़ाइल बनाएं और नीचे दिए गए कोड जोड़ें)-
<?php
	include("dbconnection.php"); // database connection
?>
<!DOCTYPE html>
<html>
    <head>
	<style>
	.card_design {
	  background: #fff6f6 !important
	  border: 1px solid #358fff;
	  box-shadow: 0 0 5px rgba(0, 0, 0, 0.49);
	}
	</style>
		<link href="https://cdn.jsdelivr.net/npm/bootstrap@5.1.3/dist/css/bootstrap.min.css" rel="stylesheet">
		<script src="https://ajax.googleapis.com/ajax/libs/jquery/3.6.0/jquery.min.js"></script>

		<script src="https://cdn.datatables.net/1.11.5/js/jquery.dataTables.min.js"></script>
		<link href="https://cdn.datatables.net/1.11.5/css/jquery.dataTables.min.css" rel="stylesheet">

		<script type="text/javascript">

        $(document).ready(function() {
			// for datatable
			$('#studentTable').DataTable();

			// check file blank or not
            $('#importSubmit').bind("click",function() {
                var imgVal = $('#fileUpload').val();
                if(imgVal==''){
                    alert("Please select csv file.");
                    return false;
                } else {
                    return true;
                }
            });

			// check file type
			$("#fileUpload").change(function () {
				var validExtensions = ["csv"]
				var file = $(this).val().split('.').pop();
				if (validExtensions.indexOf(file) == -1) {
					alert("Only csv file is allowed !");
					$("#fileUpload").val("");
					return false;
				}
			});
        });
    </script>
	</head>
	<body>
		<div class="clearfix">
			<div class="row justify-content-center">
				<div class="col-lg-6 col-md-6 col-sm-12 col-xs-12 text-center p-5">
					<div class="card card_design p-4">
					<div class="header row">
						<h4 class="heading-new">Import CSV File</h4> <hr>
					</div>
					<div class="row the-wrap">
						<div class="form-horizontal bootstrap-validator-form">
							<div class="users form">
								<form action="importProcess.php" method="post" enctype="multipart/form-data" id="importFrm">
								<div class="row justify-content-between">
									<div class="col-sm-4">
										<input type="file" name="file" id="fileUpload" class="file" />
									</div>
									<div class="col-sm-4 submit">
										<input type="submit" class="btn btn-primary" name="importSubmit" id="importSubmit" value="Import"/>
									</div>
								</div>
								</form>
							</div>
						</div>
					</div>
					</div>
				</div>
			</div>

      <!--  Code for after import csv file successfully show the records -->
			<div class="row justify-content-center">
				<div class="col-lg-8 col-md-8 col-sm-12 col-xs-12 text-center mt-3">
				<div class="table-responsive" >
				<table class="table-bordered table table-striped" id="studentTable">
				<thead>
				<tr bgcolor="#d9f2fa">
					<th>Sr. No.</th>
					<th>Student Name</th>
					<th>DOB</th>
					<th>Mobile No.</th>
					<th>E-mail ID</th>
					<th>Reg. No.</th>
					<th>Fee Status</th>
				</tr>
				</thead>

				<tbody>
				<?php
				$srNo=1;
				$dataQrs = mysqli_query($con,"SELECT * FROM student_details");
				while($results = mysqli_fetch_array($dataQrs)){
				?>
				<tr>
					<td><?php echo $srNo++; ?></td>
					<td><?php echo !empty($results['name']) ? $results['name'] : '-';?></td>
					<td><?php echo !empty($results['date_of_birth']) ? $results['date_of_birth'] : '-';?></td>
					<td><?php echo !empty($results['mobile_no']) ? $results['mobile_no'] : '-';?></td>
					<td><?php echo !empty($results['email_id']) ? $results['email_id'] : '-';?></td>
					<td><?php echo !empty($results['registration_no']) ? $results['registration_no'] : '-';?></td>
					<td><?php
						if(!empty($results['is_fee_paid'])) {
							if($results['is_fee_paid']=="1"){
								echo "Paid";
							} else {
								echo "Unpaid";
							}
						} else {
							echo "Unpaid";
						}
					?></td>
				</tr>
				<?php } $srNo++;?>
				</tbody>
				</table>
				</div>
				</div>
			</div>
		</div>
	</body>
</html>
- In this example, js & css files have been added for form validation and design (इस उदाहरण में, फॉर्म सत्यापन और डिज़ाइन के लिए js और css फ़ाइलें जोड़ी गई हैं).
- Code has been added here for show the records after import the data (डेटा इम्पोर्ट करने के बाद रिकॉर्ड दिखाने के लिए यहां कोड जोड़ा गया है).
Step : 4- Create importProcess.php file and add bellow codes –
<?php
	include("dbconnection.php"); // Database conection file include

	if (isset($_POST['importSubmit'])) {
		//validate whether uploaded file is a csv file
		$csvMimes = array('text/x-comma-separated-values', 'text/comma-separated-values', 'application/octet-stream', 'application/vnd.ms-excel', 'application/x-csv', 'text/x-csv', 'text/csv', 'application/csv', 'application/excel', 'application/vnd.msexcel', 'text/plain');
		if (!empty($_FILES['file']['name']) && in_array($_FILES['file']['type'], $csvMimes)) {
			if (is_uploaded_file($_FILES['file']['tmp_name'])) {
				//open uploaded csv file with read only mode
				$csvFile = fopen($_FILES['file']['tmp_name'], 'r');
				fgetcsv($csvFile);

				while (($line = fgetcsv($csvFile)) !== FALSE) {
					$noRec = CheckCatRegNocheck($line[4], $con);
					if ($noRec > 0) {
						mysqli_query($con,"UPDATE student_details SET name =  '" . $line[0] . "', date_of_birth = '" . $line[1] . "', mobile_no = '" . $line[2] . "', email_id = '" . $line[3] . "' , is_fee_paid = '" . $line[5] . "'WHERE registration_no = '" . $line[4] . "'");
					} else {
						if (!empty($line[0])) {
						   mysqli_query($con,"INSERT INTO student_details (name, date_of_birth, mobile_no, email_id, registration_no, is_fee_paid) VALUES ('" . $line[0] . "','" . $line[1]. "','" . $line[2]. "','" . $line[3]. "','" . $line[4]. "','" . $line[5]."')");
						}
					}
				}
				header("Location: importForm.php");
				fclose($csvFile);
			}
		}
	}

	// check exiting records from registration no.
	function CheckCatRegNocheck($regno, $con) {
		$res_sql = "SELECT * FROM student_details WHERE registration_no = '$regno'";
		$results = mysqli_query($con, $res_sql);
		$totalRec = mysqli_num_rows($results);
		return $totalRec;
    }
?>
Step : 5- Create csv file as bellow format and import it (नीचे दिए गए प्रारूप में csv फ़ाइल बनाएं और उसे इम्पोर्ट करें)-

- You can add/remove student data according to your choice (आप अपनी इच्छानुसार छात्र डेटा जोड़/हटा सकते हैं).
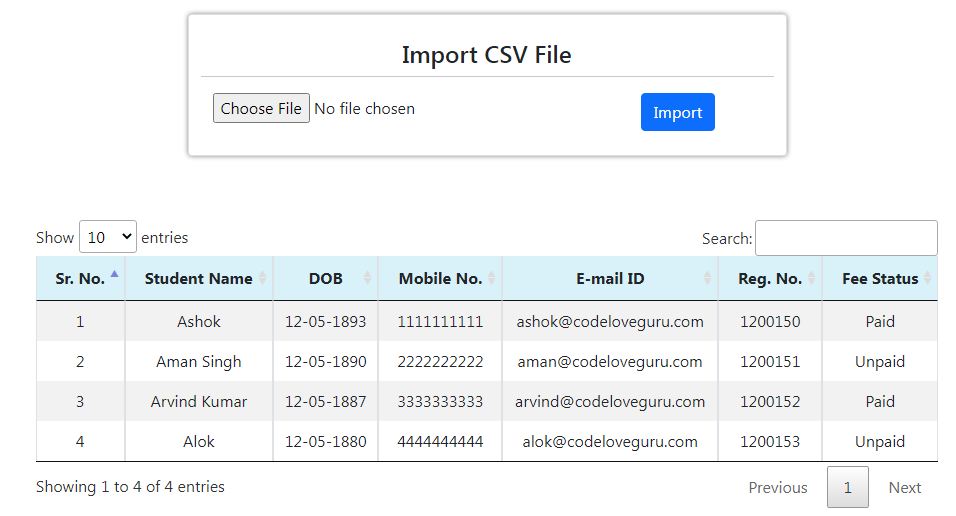
Source Code Output –
- After import data, form will look like as (डेटा आयात करने के बाद, फ़ॉर्म इस तरह दिखेगा)-
.Add Multiple Columns search box filter in DataTables…
Import csv file in MySQL using PHP
Tags: How to upload a CSV file in MySQL database, Import csv file in MySQL using PHP, Import CSV to Mysql using PHP File Read, Importing CSV data using PHP MySQL